Creative ideas EEE
LEDs with Arduino: everything you need to know
The first thing to know before using multiple LEDs is that it is a diode. These types of components are very particular since they only allow electricity to pass in one direction.
But what is that meaning? It is very simple and with practice, you will get used to using them. LEDs have one longer pin than another, that pin is known as the anode (the positive pole). It is where the current has to enter. The smallest pin is known as the cathode (negative pole) and this is where the current of electrons will exit.
LED well connected
With this clear, we can now connect multiple LEDs to our circuit. Now we just need to know what resistance to put. For this we must make use of Ohm’s Law. This Law is the fundamental base on which we must build our circuits.
This Law relates the three basic magnitudes of a voltage, current and resistance circuit. You must know and memorize the formulas that help us calculate one quantity in relation to the others. There is a circle that helps you easily remember this relationship. Covering the magnitude you want to calculate tells you how to do it based on the other two magnitudes.
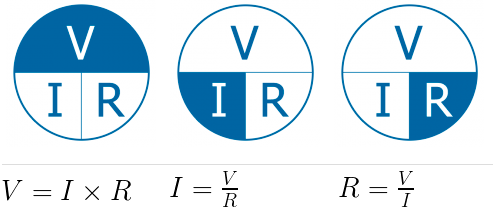
With this formula we can calculate any magnitude. In principle, we need to know two of the magnitudes to calculate the third. In the example of the intelligent traffic light with multiple LEDs and buttons, we will have to calculate it only once. Let’s see how to do it. First, take a look at this circuit:
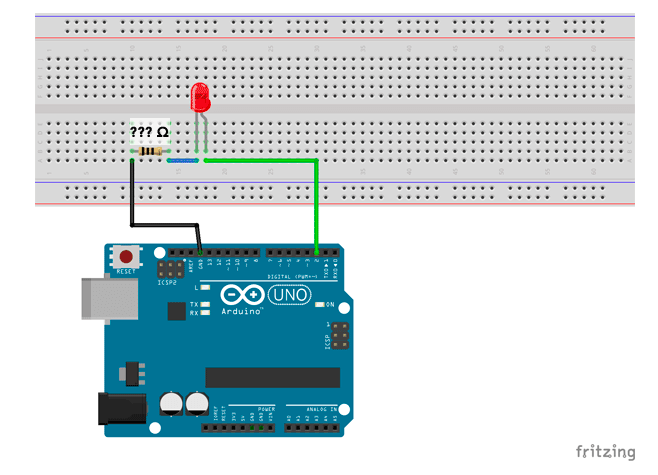
In a series circuit like the one in the example, it does not matter if you put the resistance before or after. Applying Ohm’s Law, you get the same value. At no time does this Law tell us the position of the components. This also applies to multiple LEDs.
It is a very simple circuit, an LED and a parallel resistance. But how do we calculate the value of resistance? We just have to apply Ohm’s Law. We know the voltage, 5 V, is supplied by the digital pins. The intensity can be obtained from the technical characteristics sheet of the Arduino itself as
Building an Arduino traffic light controller helps you develop basic coding skills! We get you started.


YouTube Channel for more information :
What You Need to Build an Arduino Traffic Light Controller
BOM: Click Here
BOM Arduino with 7 segment Code Click Here


YouTube: https://www.youtube.com/channel/UCcwnTKWxSlkv_iarGQ_zbPg/featured
Instagram:
https://www.instagram.com/?hl=en
Facebook:
https://www.facebook.com/Creative-ideas-EEE-110709481470623/?ref=pages_you_manage


No comments:
Post a Comment